Reproduced with permission from the January 1999 Model Railroader Magazine
|
|
||
|
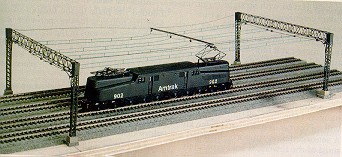
This HO scale catenary from Model Memories is an accurate model of catenary bridges which stand along the old New York, New Haven & Hartford's main line between Woodlawn Junction, N.Y., and New Haven, Conn. The etched-brass towers do a fine job of capturing the lacy look of the New Haven's distinctive towers while providing plenty of strength. This overhead wire is a simplified version of the myriad of wires that hang over prototype track, and it's not designed to carry electricity. The New Haven's electrified district between Woodlawn Junction, N. Y. (just inside the Bronx), and Stamford, Conn., featured straight-legged catenary towers and a unique triangular wire grouping. For a short stretch through Glenbrook, Conn., the New Haven used arched towers that curved inward toward the track. While attractive, the curved towers were not successful enough to extend past Glenbrook, and tapered leg towers were used from there to New Haven with straight (non-triangular) catenary. Model Memories is offering both straight and tapered-legged towers in two-, three-, and four-track widths. Also available are the single towers used to pull the wires to the side on curves. All are sold separately. For every 19" of catenary you'll need one tower, one set of preformed wire, and one span hanger. (The first section of catenary will, of course, require two bridge kits.) A set of antenna supports, installed on most of the towers, is sold separately. I built two tapered-leg bridges, since they're what I remember seeing, and since they had the straight wire. (The triangular catenary isn't available at this time, so if you want it, you're on your own.) The bridge kit includes 12 main etched-brass components and several smaller etched-brass and wire parts. Also included are plastic pieces to represent concrete footings and insulators. Before starting I recommend reading through the instruction sheets for each component. And, although cyanoacrylate adhesive (CA) or epoxy might work for assembling the bridges, I wouldn't recommend anything but solder due to the stresses inflicted on the towers by the wire. 
I had no trouble following the instructions to build the two catenary bridges. Essentially, you assemble four flat pieces to create the cross span and then assemble the components to form the legs. Once both legs and the span are complete you can solder the legs to the cross span. I found it was easiest to start by tacking the pieces together with a small amount of solder in each comer. With that done, I checked to make sure they were square, applied liquid flux to the length of the joint, then ran a bead of rosin-core solder along the joint. A little solder goes a long way - on my first attempt I used too much and had to do some time-consuming cleaning and filing. It's critical that the tower and legs
be square and plumb. To keep the parts aligned properly, I constructed
a jig by screwing a scrap piece of 1 x 2 to the top of a 1 x 4. This gave
me a handy place to hold the pieces square while I was assembling them. After the basic bridge was assembled I added the plate to the bottom of the legs, the brackets for the span wire, and the braces. The tops of the legs are open, but Model Memories has a transmission tower kit that can be built in several configurations. This drops in place into the top of a leg. I found that I really picked up speed with practice. The first bridge took me a few evenings to assemble, the second was done in an evening, and I finished a third inside of 90 minutes. I airbrushed the finished towers with a 50/50 mixture of Polly Scale Steam Power Black and Tarnished Black. When using the Model Memories cast-resin footings, the top of the footing should be level with the top (running) surface of the rail to place the span wire at the proper height. My wire was pre-assembled in 19" lengths (other lengths are available). Prototype wires weather to a green patina, so I airbrushed mine Polly Scale New York Central Jade Green. I drilled mounting holes for the two bridges and installed them in the resin bases using the screws provided. These screws make it a simple matter to remove the catenary for maintaining the track. Frankly, I was nervous about putting the wires in place, but the tips in the instructions made this stage anticlimactic. The most critical area is keeping the trolley wire a constant height (23 feet on the prototype) above the rails. I used a wooden block with notches cut to fit over the rails to hold the wire at a scale 23 feet. I also used a few small pieces of modeling clay to hold the wires to the bridge while I soldered the catenary together. Upon seeing the catenary, some of my fellow staffers commented that the wires weren't centered over the track. That's quite true. The wires run at a slight angle to the rails, and from overhead a slight zigzag pattern is apparent. This is done on the prototype so the pantographs will wear evenly. Once I installed the wire on the bridge, I slipped the span bar into place halfway between the two bridges and installed the wires to the second bridge. Model Memories is also offering New York Central third-rail components as well as Pennsylvania RR catenary (which looked quite a bit different than the New Haven's). This catenary looks great, and I bet it won't be long before somebody figures out a way to use these bridges with live overhead. I'm thrilled that Model Memories has made it easy to re-create a small piece of one of the most interesting railroads in the Northeast. - M. M. |
| |
PRODUCTS |
PICTURES |